Sunday, December 12, 2021

Valheim and Nexus mods

I like Valheim, I also like mods.

Nexus mods makes it easeier, but it's still confusing.
  1. Create an account at Nexus mods; Click "Register" at the top left.

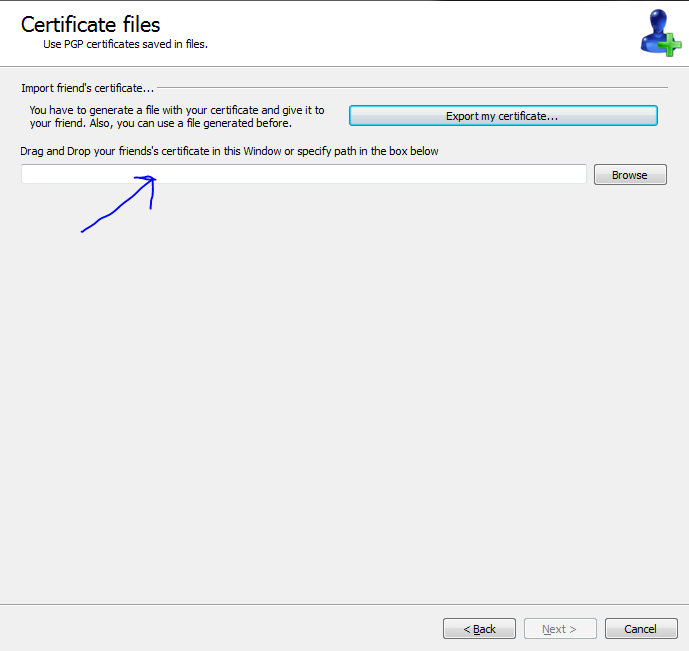
  2. Go here and download Vortex
  3. Log in in the browser and in Vortex
  4. Go to "Games" in Vortex, and search for Valheim. Add it.
    1. Note that at the top there is a bell with notifications.

    2. You will need to keep watching that whenever you make changes in Vortex. In this example, I just installed "ValheimPlus" (which doesn't actually work with server play, unless the server has it installed). I would start at the bottom, elevate, dismiss, deploy. (though I'm not sure if that order matters.
  5. If you are prompted, after adding Valheim, to install unstripped dlls, managed by Vortex, do it. This is the equivelent of the BepinEx mod set. If you do it through vortex, you do not need to do it other places.
  6. Now you're set. Go to the Mods tab:

    This is where the mods will appear when they're installed. Right now you probably just have 'unstripped_managed.zip'

Now I'll show you a list of the mods I have installed, and whatever installation was required. All of these mods will work without anything being installed on the server.

These are in order to how important I think they are for quality of life in valheim.
  1. Quick Connect: Moderate configuration
    1. I play on two servers. This makes it easy to connect without inserting the password each time.
    2. After the mod is installed, go to 'Games'
      Click the '+' icon over valheim, then click 'open', then click 'open mod folder'
    3. Go up one folder, and then navigate to 'config'
    4. Open and edit "quick_connect_servers.cfg'
    5. All lines starting with a '#' are ignored, so ensure all non-blank rows have a '#' at the beginning.
    6. Insert at the end: <server name>:<server ip>:<server port>:<server password>
      So if you want to call your server "server1" and it's ip is 8.8.8.8 with port: '2456' (that's default) and password: "password" the row would look like:
      1. server1:8.8.8.8:2456:password
    7. Note that you can drop the last bit if there is no password, You can also look at the examples in the 'quick_connect_servers.cfg' file.
  2. Craft from Containers: No configuration
    1. This makes it so you don't have to find the materials in each chest before you can craft and upgrade.
  3. Quick Stack: No configuration, some trickiness; Edit: 2023-11-28; this one is replaced with "Quick Stack - Store - Sort - Trash - Restock"
    1. Once this is installed, you can press ` (by default) to autoload the stuff in your inventory into nearby chests with the same items.
    2. You can mark some items to not be quick stacked, 
  4. Vehicle Map Marker
    1. Marks carts and boats.
    2. There's a weird bug if you switch servers, it might bring markers from the one server over, but they eventually clear.
  5. Clock
    1. It's really nice to know how soon nighttime is coming.
  6. Farm Grid
    1. You can place farm items faster with this mod.
  7. AutoPicker: minimal configuration
    1. This makes it easier to collect materials while farming.
      Also nice for collecting berries, thistle, seeds and mushrooms.
    2. There's a way you can edit the items that are auto picked up. Turning off wood, stone, flint and dandelions made this plugin more bearable.
If you find other mods that you would recommend let me know.

Friday, April 3, 2020

hamster-time-tracker hack

We use Hamster Tracker to keep track of our hours here at work (then we have a script to copy them into our timesheet database).

I didn't like the upgrade, but our work machines were upgraded to debian 10.

I ported the copy over following these steps:

1) copy from working system:
- /usr/bin/hamster-time-tracker
- /usr/lib/python2.7/dist-packages/hamster/
- /usr/lib/python2.7/dist-packages/gtk-2.0/gconf.so
- /usr/share/hamster-applet
2) install packages:
- python-gtk2
- python-dbus
- python-dirspec
- gconf-service

Thursday, March 3, 2016

Simple Kodi installation from Minimal Ubuntu

First go here to Download a minimal ubuntu cd:
https://help.ubuntu.com/community/Installation/MinimalCD
Debian also will work, but I'm used to ubuntu...

Then run the following script:

#!/bin/bash
# First do a minimal ubuntu install
USER=isaac
sudo add-apt-repository ppa:team-xbmc/ppa  && \

    sudo apt-get update && sudo apt-get upgrade && \
    sudo apt-get install openbox nodm kodi xorg
sudo sed -i 's/NODM_USER=.*/NODM_USER='$USER'/' /etc/default/nodm
sudo sed -i 's/NODM_ENABLED=.*/NODM_ENABLED=true/' /etc/default/nodm
echo -e '#!/bin/bash\nopenbox &\nkodi' | sudo -u $USER tee /home/$USER/.xsession


This will set up Kodi to automatically start when you turn on your computer.

Saturday, August 29, 2015

Setting up Retoshare to share files

There are plenty of guides out there about setting up Retroshare06, but I'll add my own.

Setting up Retroshare

1) Download retroshare here:
http://retroshare.sourceforge.net/downloads.html

2) Install it

3) Set up the key
As it says, the name is what your friends, and their friends, will see you as. This name is not public, unless you go out of your way to connect to large groups of people.
For Node, I've usually used my computer name, since I give all my computers names.

4) If you know how to set up a port forward in your network, doing that is advised to help your friends connect to you better. If you do that, then go to:
Options -> Network
Then set "Automatic UPnP" to "Manual Firewalled", and type in the port that you forwarded.
If you don't do this, you will probably be fine if you connect to at least one friend who sets up port forwarding. If you connect to me, you'll probably be fine.

5) Go to "Add" and choose either "Enter Certificate manually" or "You get a certificate file from your friend". In the case of the former, you'll copy and paste the key. In the case of the later, you'll import and export a file. The later seems simpler, so let's use that.

6) So you need to exchange keys at this point. You need to give your key to your friend, and they need to give you their key. Click the "Export My Certificate..." button, and save the key to your desktop.
If you're curious, this is your public key. This can be shared safely with anyone who you want to send you data.

7) Send this key to your friend, perhaps via email.

8) When they give you their key, (let's assume a file) go back to the Connect Friends Wizard (Add, if you closed the window) and drag the key to the text box near the "Browse" button.

9) Click Next. The default options are good (and you can always change them later), so click Finish.


Downloading and browsing files:
You're connected to your friend, and assuming they've set up file browsing up properly, you should be able to search their files. Let's look through their files, first, and then you can see how to share some of your own files with them.

1) Click File Sharing
2) Click Search: Here you can type in a file name to search across all collections.
3) Click  "Friends Files" and you can see a list of all the files that are browsable.

You can then right click on a file to download it, and it'll show up in your "Downloads" tab.


Retroshare does a lot of other things, that are interesting, and a pretty cool way to do distributed communication etc. But sharing files directly between computers is pretty powerful.

Saturday, September 27, 2014

Download and merge multiple video files (from twitch or youtube)

Last year I posted how to download and merge clips manually, recently I threw together a script that takes a twitch video, downloads the mp4 files, and them merges them all.

You'll have to download and compile ffmpeg which is a hassle, but since I use this script often it's worth the trouble.

#!/bin/bash
tempfolder=$(mktemp -d --tmpdir=./)

pushd $tempfolder
read -p "Input the date (YYYY-MM-DD): " date
echo "files:"
youtube-dl -e $@    # lists the file titles
echo "choosing one"
default_name=$(youtube-dl -e $@ 2>&1| head -1)
read -p "Name is $default_name. Override?: " name
if [ -z "$name" ]; then
    name=$default_name
fi

youtube-dl $@
file=$(mktemp --tmpdir=./)
for i in *.flv; do
    echo "file '$i'";
done > $file
ffmpeg -f concat -i $file -c copy "$date - $name.mp4"
mv "$date - $name.mp4" ..

popd
rm -r $tempfolder

The script will actually take multiple links as well, and concat them in order according to the twitch IDs.

Psql Snapshot

Ever want to make some temporary changes to a (test) database, that you can't do with just commits? I can't remember why I needed this, but it looks handy.

#!/bin/bash
# This was to create a quick snapshot of the database, make the changes I
# wanted, and then revert the database to exactly the way it was before I
# snapshotted it.


/etc/init.d/postgresql stop
umount /var/lib/postgresql/
lvcreate --snapshot --size 1G --name postgres-snap /dev/vg0/postgres
mount /dev/vg0/postgres-snap /var/lib/postgresql/
/etc/init.d/postgresql start

read -p "Press enter to start watching. And then ^C to drop the snapshot and switch to the old database" zzz
watch lvs

/etc/init.d/postgresql stop
umount /dev/vg0/postgres-snap && /sbin/lvremove --force /dev/vg0/postgres-snap
mount /var/lib/postgresql/
/etc/init.d/postgresql start

Transwiki copying

Update, 2023-06-13: please refer to the github page for how to use the download and import.
The details on the page are out of date, and a recent import showed some of the issues.