There are plenty of guides out there about setting up Retroshare06, but I'll add my own.
Setting up Retroshare
1) Download retroshare here:
http://retroshare.sourceforge.net/downloads.html
2) Install it
3) Set up the key
 As
it says, the name is what your friends, and their friends, will see you as. This
name is not public, unless you go out of your way to connect to large
groups of people.
As
it says, the name is what your friends, and their friends, will see you as. This
name is not public, unless you go out of your way to connect to large
groups of people.
For Node, I've usually used my computer name, since I give all my computers names.
4) If you know how to set up a port forward in your network, doing that is advised to help your friends connect to you better. If you do that, then go to:
Options -> Network
Then set "Automatic UPnP" to "Manual Firewalled", and type in the port that you forwarded.
If you don't do this, you will probably be fine if you connect to at least one friend who sets up port forwarding. If you connect to me, you'll probably be fine.
 5) Go to "Add" and choose either "Enter Certificate manually" or "You get a certificate file from your friend". In the case of the former, you'll copy and paste the key. In the case of the later, you'll import and export a file. The later seems simpler, so let's use that.
6) So you need to exchange keys at this point. You need to give your key to your friend, and they need to give you their key. Click the "Export My Certificate..." button, and save the key to your desktop.
If you're curious, this is your public key. This can be shared safely with anyone who you want to send you data.
7) Send this key to your friend, perhaps via email.
8) When they give you their key, (let's assume a file) go back to the Connect Friends Wizard (Add, if you closed the window) and drag the key to the text box near the "Browse" button.
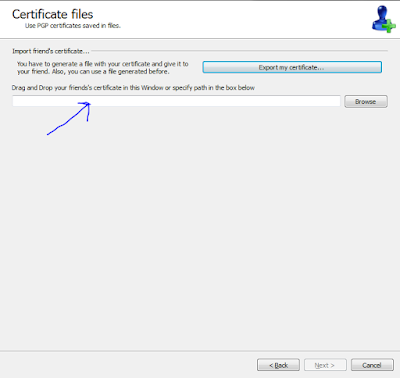
9) Click Next. The default options are good (and you can always change them later), so click Finish.
Downloading and browsing files:
 You're connected to your friend, and assuming they've set up file browsing up properly, you should be able to search their files. Let's look through their files, first, and then you can see how to share some of your own files with them.
1) Click File Sharing
2) Click Search: Here you can type in a file name to search across all collections.
3) Click "Friends Files" and you can see a list of all the files that are browsable.
 You can then right click on a file to download it, and it'll show up in your "Downloads" tab.

Retroshare does a lot of other things, that are interesting, and a pretty cool way to do distributed communication etc. But sharing files directly between computers is pretty powerful.
Setting up Retroshare
1) Download retroshare here:
http://retroshare.sourceforge.net/downloads.html
2) Install it
3) Set up the key

For Node, I've usually used my computer name, since I give all my computers names.
4) If you know how to set up a port forward in your network, doing that is advised to help your friends connect to you better. If you do that, then go to:
Options -> Network
Then set "Automatic UPnP" to "Manual Firewalled", and type in the port that you forwarded.
If you don't do this, you will probably be fine if you connect to at least one friend who sets up port forwarding. If you connect to me, you'll probably be fine.
5) Go to "Add" and choose either "Enter Certificate manually" or "You get a certificate file from your friend". In the case of the former, you'll copy and paste the key. In the case of the later, you'll import and export a file. The later seems simpler, so let's use that.6) So you need to exchange keys at this point. You need to give your key to your friend, and they need to give you their key. Click the "Export My Certificate..." button, and save the key to your desktop.
If you're curious, this is your public key. This can be shared safely with anyone who you want to send you data.
7) Send this key to your friend, perhaps via email.
8) When they give you their key, (let's assume a file) go back to the Connect Friends Wizard (Add, if you closed the window) and drag the key to the text box near the "Browse" button.
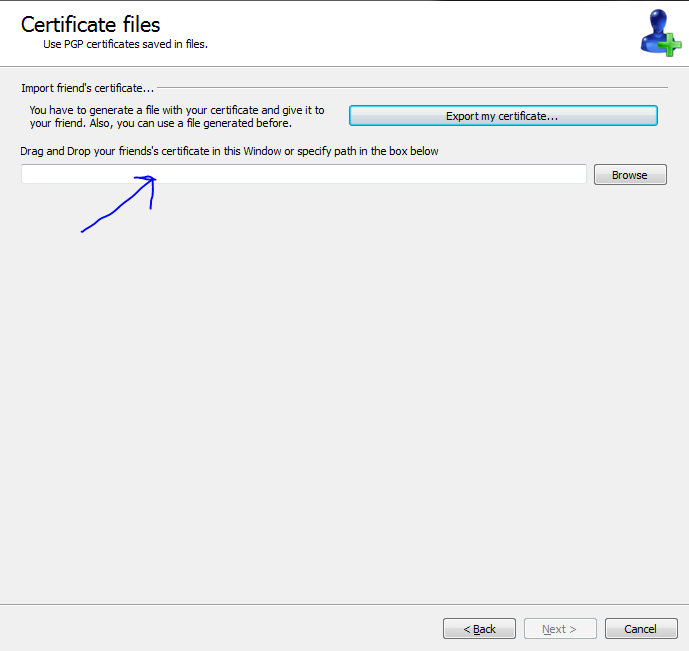
9) Click Next. The default options are good (and you can always change them later), so click Finish.
Downloading and browsing files:
1) Click File Sharing
2) Click Search: Here you can type in a file name to search across all collections.
3) Click "Friends Files" and you can see a list of all the files that are browsable.

Retroshare does a lot of other things, that are interesting, and a pretty cool way to do distributed communication etc. But sharing files directly between computers is pretty powerful.
