Sunday, December 12, 2021

Valheim and Nexus mods

I like Valheim, I also like mods.

Nexus mods makes it easeier, but it's still confusing.
  1. Create an account at Nexus mods; Click "Register" at the top left.

  2. Go here and download Vortex
  3. Log in in the browser and in Vortex
  4. Go to "Games" in Vortex, and search for Valheim. Add it.
    1. Note that at the top there is a bell with notifications.

    2. You will need to keep watching that whenever you make changes in Vortex. In this example, I just installed "ValheimPlus" (which doesn't actually work with server play, unless the server has it installed). I would start at the bottom, elevate, dismiss, deploy. (though I'm not sure if that order matters.
  5. If you are prompted, after adding Valheim, to install unstripped dlls, managed by Vortex, do it. This is the equivelent of the BepinEx mod set. If you do it through vortex, you do not need to do it other places.
  6. Now you're set. Go to the Mods tab:

    This is where the mods will appear when they're installed. Right now you probably just have 'unstripped_managed.zip'

Now I'll show you a list of the mods I have installed, and whatever installation was required. All of these mods will work without anything being installed on the server.

These are in order to how important I think they are for quality of life in valheim.
  1. Quick Connect: Moderate configuration
    1. I play on two servers. This makes it easy to connect without inserting the password each time.
    2. After the mod is installed, go to 'Games'
      Click the '+' icon over valheim, then click 'open', then click 'open mod folder'
    3. Go up one folder, and then navigate to 'config'
    4. Open and edit "quick_connect_servers.cfg'
    5. All lines starting with a '#' are ignored, so ensure all non-blank rows have a '#' at the beginning.
    6. Insert at the end: <server name>:<server ip>:<server port>:<server password>
      So if you want to call your server "server1" and it's ip is 8.8.8.8 with port: '2456' (that's default) and password: "password" the row would look like:
      1. server1:8.8.8.8:2456:password
    7. Note that you can drop the last bit if there is no password, You can also look at the examples in the 'quick_connect_servers.cfg' file.
  2. Craft from Containers: No configuration
    1. This makes it so you don't have to find the materials in each chest before you can craft and upgrade.
  3. Quick Stack: No configuration, some trickiness; Edit: 2023-11-28; this one is replaced with "Quick Stack - Store - Sort - Trash - Restock"
    1. Once this is installed, you can press ` (by default) to autoload the stuff in your inventory into nearby chests with the same items.
    2. You can mark some items to not be quick stacked, 
  4. Vehicle Map Marker
    1. Marks carts and boats.
    2. There's a weird bug if you switch servers, it might bring markers from the one server over, but they eventually clear.
  5. Clock
    1. It's really nice to know how soon nighttime is coming.
  6. Farm Grid
    1. You can place farm items faster with this mod.
  7. AutoPicker: minimal configuration
    1. This makes it easier to collect materials while farming.
      Also nice for collecting berries, thistle, seeds and mushrooms.
    2. There's a way you can edit the items that are auto picked up. Turning off wood, stone, flint and dandelions made this plugin more bearable.
If you find other mods that you would recommend let me know.

Friday, April 3, 2020

hamster-time-tracker hack

We use Hamster Tracker to keep track of our hours here at work (then we have a script to copy them into our timesheet database).

I didn't like the upgrade, but our work machines were upgraded to debian 10.

I ported the copy over following these steps:

1) copy from working system:
- /usr/bin/hamster-time-tracker
- /usr/lib/python2.7/dist-packages/hamster/
- /usr/lib/python2.7/dist-packages/gtk-2.0/gconf.so
- /usr/share/hamster-applet
2) install packages:
- python-gtk2
- python-dbus
- python-dirspec
- gconf-service

Thursday, March 3, 2016

Simple Kodi installation from Minimal Ubuntu

First go here to Download a minimal ubuntu cd:
https://help.ubuntu.com/community/Installation/MinimalCD
Debian also will work, but I'm used to ubuntu...

Then run the following script:

#!/bin/bash
# First do a minimal ubuntu install
USER=isaac
sudo add-apt-repository ppa:team-xbmc/ppa  && \

    sudo apt-get update && sudo apt-get upgrade && \
    sudo apt-get install openbox nodm kodi xorg
sudo sed -i 's/NODM_USER=.*/NODM_USER='$USER'/' /etc/default/nodm
sudo sed -i 's/NODM_ENABLED=.*/NODM_ENABLED=true/' /etc/default/nodm
echo -e '#!/bin/bash\nopenbox &\nkodi' | sudo -u $USER tee /home/$USER/.xsession


This will set up Kodi to automatically start when you turn on your computer.

Saturday, August 29, 2015

Setting up Retoshare to share files

There are plenty of guides out there about setting up Retroshare06, but I'll add my own.

Setting up Retroshare

1) Download retroshare here:
http://retroshare.sourceforge.net/downloads.html

2) Install it

3) Set up the key
As it says, the name is what your friends, and their friends, will see you as. This name is not public, unless you go out of your way to connect to large groups of people.
For Node, I've usually used my computer name, since I give all my computers names.

4) If you know how to set up a port forward in your network, doing that is advised to help your friends connect to you better. If you do that, then go to:
Options -> Network
Then set "Automatic UPnP" to "Manual Firewalled", and type in the port that you forwarded.
If you don't do this, you will probably be fine if you connect to at least one friend who sets up port forwarding. If you connect to me, you'll probably be fine.

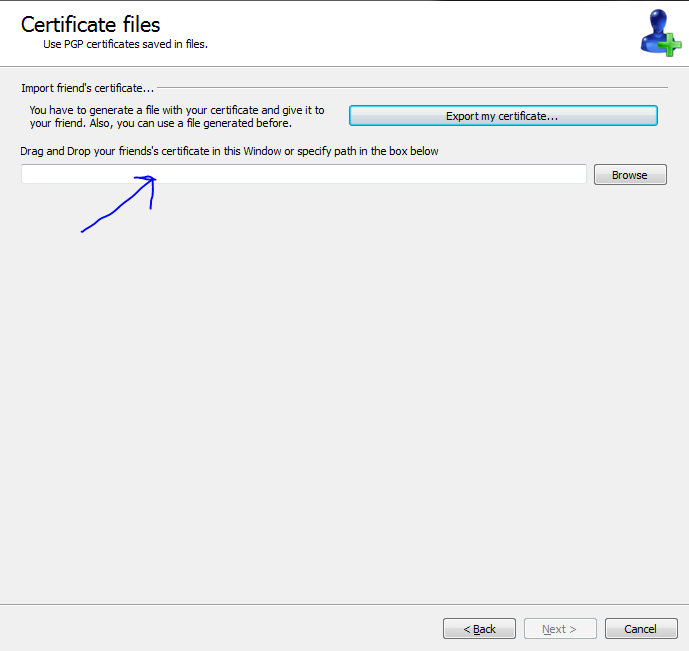
5) Go to "Add" and choose either "Enter Certificate manually" or "You get a certificate file from your friend". In the case of the former, you'll copy and paste the key. In the case of the later, you'll import and export a file. The later seems simpler, so let's use that.

6) So you need to exchange keys at this point. You need to give your key to your friend, and they need to give you their key. Click the "Export My Certificate..." button, and save the key to your desktop.
If you're curious, this is your public key. This can be shared safely with anyone who you want to send you data.

7) Send this key to your friend, perhaps via email.

8) When they give you their key, (let's assume a file) go back to the Connect Friends Wizard (Add, if you closed the window) and drag the key to the text box near the "Browse" button.

9) Click Next. The default options are good (and you can always change them later), so click Finish.


Downloading and browsing files:
You're connected to your friend, and assuming they've set up file browsing up properly, you should be able to search their files. Let's look through their files, first, and then you can see how to share some of your own files with them.

1) Click File Sharing
2) Click Search: Here you can type in a file name to search across all collections.
3) Click  "Friends Files" and you can see a list of all the files that are browsable.

You can then right click on a file to download it, and it'll show up in your "Downloads" tab.


Retroshare does a lot of other things, that are interesting, and a pretty cool way to do distributed communication etc. But sharing files directly between computers is pretty powerful.

Saturday, September 27, 2014

Download and merge multiple video files (from twitch or youtube)

Last year I posted how to download and merge clips manually, recently I threw together a script that takes a twitch video, downloads the mp4 files, and them merges them all.

You'll have to download and compile ffmpeg which is a hassle, but since I use this script often it's worth the trouble.

#!/bin/bash
tempfolder=$(mktemp -d --tmpdir=./)

pushd $tempfolder
read -p "Input the date (YYYY-MM-DD): " date
echo "files:"
youtube-dl -e $@    # lists the file titles
echo "choosing one"
default_name=$(youtube-dl -e $@ 2>&1| head -1)
read -p "Name is $default_name. Override?: " name
if [ -z "$name" ]; then
    name=$default_name
fi

youtube-dl $@
file=$(mktemp --tmpdir=./)
for i in *.flv; do
    echo "file '$i'";
done > $file
ffmpeg -f concat -i $file -c copy "$date - $name.mp4"
mv "$date - $name.mp4" ..

popd
rm -r $tempfolder

The script will actually take multiple links as well, and concat them in order according to the twitch IDs.

Psql Snapshot

Ever want to make some temporary changes to a (test) database, that you can't do with just commits? I can't remember why I needed this, but it looks handy.

#!/bin/bash
# This was to create a quick snapshot of the database, make the changes I
# wanted, and then revert the database to exactly the way it was before I
# snapshotted it.


/etc/init.d/postgresql stop
umount /var/lib/postgresql/
lvcreate --snapshot --size 1G --name postgres-snap /dev/vg0/postgres
mount /dev/vg0/postgres-snap /var/lib/postgresql/
/etc/init.d/postgresql start

read -p "Press enter to start watching. And then ^C to drop the snapshot and switch to the old database" zzz
watch lvs

/etc/init.d/postgresql stop
umount /dev/vg0/postgres-snap && /sbin/lvremove --force /dev/vg0/postgres-snap
mount /var/lib/postgresql/
/etc/init.d/postgresql start

Transwiki copying

Update, 2023-06-13: please refer to the github page for how to use the download and import.
The details on the page are out of date, and a recent import showed some of the issues.

Thursday, December 26, 2013

Installing Armory

The Armory installer isn't quite up to date. The installer I found on their website: https://bitcoinarmory.com/download/ had RAM leaking issues.

sudo apt-get install git-core build-essentials python-dev \
    python-psutil swig pyqt4-dev-tools bitcoind

git clone https://github.com/etotheipi/BitcoinArmory.git
cd BitcoinArmory/cppForSwig
./whereispy.sh
make swig
cd ..

Note: 'whereispy.sh' is run by 'make swig'. I ran it first just to make sure I have all the dependencies, since make swig swallows the errors in 'whereispy.sh'

Now you can run ArmoryQt.py, just to make sure everything works:
python ArmoryQt.py

I decided that I wanted to "install" it, so I copied the folder to /usr/lib/
cd ..
sudo mv BitcoinArmory /usr/lib/armory

Adding the desktop icon:

I decided to update the armory icon, since it was pointed to an icon pack I didn't install.
cd /usr/lib/armory
sed -ie "s/Icon=.*/Icon=\/usr\/lib\/armory\/img\/armory64x64.ico/" \
    dpkgfiles/armory.desktop

chmod +x dpkgfiles/armory.desktop

Then copy it to your list of local applications:
cp /usr/lib/armory/dpkgfiles/armory.desktop ~/.local/share/applications/

Now the a launcher shows up in unity, with the right icon.

Friday, September 13, 2013

Downloading and trimming clips

There are two ways to download the clips, and get them the converted for Mythtv (the right times, etc)

1) twitchtv:
# youtube-dl "http://www.twitch.tv/riotgamesoceania/b/457578762"
downloads many parts
# for i in *.flv; do echo "file '$i'"; done > inputs.txt
# ffmpeg -f concat -i inputs.txt -c copy output.mp4

Youtube doesn't need this, because they show up as one file. However, they do still need to be trimmed. If you need to trim it then, mark the times.

For example:
'input.webm' start: 5:27:00 end: 8:28:28
Then you can convert the file with ffmpeg:
# ffmpeg -y -ss 5:27:00 -t 3:01:28 -i 'input.webm' -c copy 'output.webm'

Monday, September 2, 2013

Django logging

Django has a pretty configurable logging facility.

The other day I had to customize error emails in django.

I did this by copying django's AdminEmailHandler, to a local file, and then pointing the logging utility to this.

The django guide has a large configuration that you can strip. Let's strip it down to this:

LOGGING = {
    'version': 1,
    'handlers': {
        'mail_admins': {
            'level': 'ERROR',
            'class': 'django.utils.log.AdminEmailHandler',
        },
    },
    'loggers': {
        'django.request': {
            'handlers': ['mail_admins'],
            'level': 'ERROR',
            'propagate': False,
        },
    },
}
 
Note the default configuration for the class. This is also where you copied the AdminEmailHandler. Point it to the new location that you saved it. I wasn't sure of a good place so I saved it in 'project/middleware/custom_email.py' and referenced it: "project.middleware.custom_email.AdminEmailHandler"

Now all you need to do is change the email handler to return emails the way you want. I stripped out the file so that it was just the classs and the required dependancies, because I didn't want to override other things that I didn't need to.

Friday, August 16, 2013

Icinga bouncing menus


I got annoyed with the bouncing menues in icinga. Basically they added a 'on hover' to the links, that increases the padding.

You can remove it by deleting the jquery hover:

--- /usr/share/icinga/htdocs/js/menu.js
+++ /usr/share/icinga/htdocs/js/menu.js
@@ -18,13 +18,4 @@
         });

     });
-    // Links
-    $("div#menu ul li a").hover(function( e ) {
-        var speed = 200,
-            padding = 10,
-            mode = e.type === "mouseenter" ? "+=" : "-=";
-        $(this).parent("li").animate({
-            paddingLeft: mode+padding+'px'
-        }, speed );
-    });
 });


Saturday, July 6, 2013

Vanilla forums: Batch Decline participants

Our Forum in Kenya was spammed. I had decidd to use vanillaforums as the forum software (a choice I'm not so sure about anymore).

I decided to set the registration as "approval by moderator", which meant that the spam bots were filtered into a "Applicants queue". After ~2-3 weeks the applicant list was 5 thousand.

Clicking each one was not feasible. So I wrote this javascript:

if (typeof String.prototype.startsWith != 'function') {
    "use strict";
    String.prototype.startsWith = function (str){
        return this.slice(0, str.length) == str;
    };
}

var time_wait = 0,
    string_check = '[url=http://',
    action = 'decline',
    forum_url = 'domain.forum.com',
    pause_time = 10000;
$('[type=checkbox]').each(function () {
    "use strict";
    var curelem = $(this),
        parent_group = curelem.parent().parent().children(),
        request_text = $(parent_group[1]).children()[2].textContent,
        key = $($(parent_group[2]).children()[0]).attr("href").split("/").reverse()[0];

    var user_call = function (id, action, time, key) {
        console.log("val = " + id + ", time_wait = " + time);
        window.setTimeout(function () {
            $.ajax({
                url: 'http://' + forum_url + '/user/' + action + '/' + id + '/' + key,
                type: 'POST',
            });
        }, time);
    };

    if (request_text.startsWith(string_check)) {
        user_call(curelem.val(), action, time_wait, key);
        time_wait = time_wait + pause_time;
    }
});

This will go through and fire off an ajax call, which will decline each user. It does this in increments of 10 seconds.

It had to be 10 seconds, because with around 5 thousand applicants, the list was 3M. (I've used up ~2G on our host, just from trying to load this applicants page).

I've created a ticket about this issue:
https://github.com/vanillaforums/Garden/issues/1627

In the meantime if you dont' feel like waiting the 10 seconds, and want to edit php:
Open up 'applications/dashboard/controllers/class.usercontroller.php'
Find 'public function Decline'
The last line of the function is
$this->Applicants();
change this to
$Action = $this->Form->GetValue('Submit');

With this change, the calls took ~400ms, so I changed time (in the script) to 1000.

This worked for me in Vanilla Forums v2.0.18.8

Thursday, March 31, 2011

Using pppconfig with Mobile Broadband

The most stable way to connect to mobile broadband internet connections, is to use pppconfig. This is a brief tutorial on how to do that.

1) Open up a terminal
2) run sudo pppconfig
3) create a connection, and name it something distinctive

4) dns
If you know of good dns address, you can choose static and place them.
Otherwise, choose dynamic

5) Authentication Method
Choose "CHAP" unless you know which you should use.

6) Username and password
Enter the username and password provided with the modem

7) Modem Speed
Leave the modem speed the default that they give you

8) Pulse or Tone
Leave the Pulse or Tone setting, the one that they give you

9) Phone Number
For the phone number enter one of the two numbers below:
*99# if the modem is GSM
#777 if the modem is CDMA

10) Modem Port
For the Modem Port, you'll have to type it in manually:
/dev/ttyUSB0

11) Scroll to "Advanced options" and press "enter"

12) Scroll to "Persist" and press enter
13) Choose "Yes" to enable

14) Once you're finished, scroll to "previous", press enter. Scroll to "Finished" and press enter.
Scroll to "quit" and press enter.


Adding more options to your connection to stablize it:
1) remember the name of your connection that you chose in step three of pppconfig.
2) Alt+f2 for the run prompt, and type:
gksudo gedit /etc/ppp/peers/
3) Add the following text at the end of the file:
==========
lock
lcp-echo-failure 100
lcp-echo-interval 36000
==========
(Don't put the "=" in the file, just what's in between)

4) Save the file and close


Running your connection
1) make sure that your modem is connected *after* the computer is turned on.
2) remember the name of your connection that you chose in step three of pppconfig
3) run "sudo pon " or if you left it default (providers) just run "sudo pon"

Tuesday, March 29, 2011

Installing Software and providing support

One of the big issues that we have as a group of two, running technical support for schools across Kenya is managing to find a way that we can help everyone while not actually being there.

Ok, so we haven't really had this problem too much yet, but I can only imagine how bad it will get.

To fix this problem we've decided that one of the best options is to teach the school how to install; that way if there's a major problem they can just wipe the computers and start over.
This means two things:
1) we have to make our content easily accessible
2) we have to use a distro that is very easy to install and set up.

We've decided that Linux Mint is the best option. Both Linux Mint 9 and 10 look very similar to Windows, and have a simple interface.

So then we just need to teach them how to install basic software after they do the installation from disk, which didn't turn out to be that bad.

Most of our communication is done on-line so that makes it easier also.

This means that the major issues that we might have are with the software that's supposed to save them bandwidth (apt-cacher-ng, and squid) as those are the two complex networking softwares that would be hardest to fix. So far we haven't heard of many examples where schools have had problems with them.

On the other hand of it, another technical guy from the area and I are working together to figure out how we can prepare for the year I won't be here. This involves teaching him quite a bit of linux, since his background is in Windows.
I've found a few resources, nothing amazing, but stuff that might be helpful if someone else was trying to pick it up. For the most part a combination of the Ubuntu manual and the Linux Mint manual have helped, though I'm still hoping to find a good, online, resource for learning Bash and general command prompt commands.

Tuesday, January 5, 2010

Eee PC with Ubuntu (update)

I've done a bit of research today, and got a bit of a better "battery saving" setup for my laptop.

Saving your SSD disk

The default settings for Ubuntu are built to work with a spinning disk. Since you really want your disk to last as long as possible, it's better to minimize the disk writes.
Edit your fstab so that specific directories are sent to memory instead of disk:
tmpfs      /var/log        tmpfs        defaults           0    0
tmpfs /tmp tmpfs defaults 0 0
tmpfs /var/tmp tmpfs defaults 0 0
tmpfs /var/log/apt tmpfs defaults 0 0
From help.ubuntu.com.
The one thing that is annoying though, is anytime you run aptitude, it throws an error about /var/log/apt which it can't make...
So I added "mkdir /var/log/apt" to a start script.

Then You can point different applications to /tmp, for example Firefox:

  • Go to the address 'about:config.'
  • Create a new value 'browser.cache.disk.parent_directory' as a string and set it to '/tmp'
At first I was afraid it would just dump everything there, but don't worry. It makes the folder "Cache" in /tmp

Other Hard Drive tweaks

Another minor fix with the disk is to switch to "deadline". Run:
cat /sys/block/sda/queue/scheduler
and you'll probably get something like:
noop anticipatory deadline [cfq]
Apparently deadline and noop are the options, but deadline is better. Set it to deadline with this:
echo deadline > /sys/block/sda/queue/scheduler
This will need to be a start script.

We can also add FIFO queuing by running the command:

echo 1 > /sys/block/sda/queue/iosched/fifo_batch
Again, this resets on boot, so you'll need to make a start script.

Disabling/Controlling Hardware features

First off, You should install eee-control. The version for Karmic just recently came out, and isn't quite the same now that the developer is declared missing, but it will still turn on and off most of the things you need.

The one thing to note, is that I still haven't figured out how to get wireless to work. It's easy to turn on, but crashes when you turn it off. However, if you turn it off on start up (ie before the gui loads), then somehow it doesn't crash.

In anycase, I like to turn everything off on startup, so I'm going to add the following to a start script:

# camera
echo 0 > /sys/devices/platform/eeepc/camera
# card reader
echo 0 > /sys/devices/platform/eeepc/cardr
# wireless
echo 0 > /sys/devices/platform/eeepc/rfkill/rfkill0/state
That way if I need it, I'll turn it on. If I don't, then it won't use up battery. And Eee-control-tray makes it very easy to enable features when I need them.

Power Management

Ubuntu has some built in things to extend laptop battery life, and still maintain full power while plugged in, but not nearly what it could be.
For example. What if we want to turn our computer's proc the whole way up while we're on AC, turn brightness the whole way up, increase disk writes, and have the screen dim after 10 minutes:
echo 0 > /proc/sys/vm/laptop_mode
# turn brightness up the whole way
echo 15 > /sys/devices/platform/eeepc/backlight/eeepc/brightness
echo 10 > /proc/sys/vm/dirty_ratio
echo 5 > /proc/sys/vm/dirty_background_ratio
echo 500 > /proc/sys/vm/dirty_writeback_centisecs
# screen off after 10 minutes
xset dpms 0 0 600
Well, then we want quite a bit different for when the laptop goes into battery mode.
Check this out:
#!/bin/bash
if on_ac_power; then
# Reset back to normal settings
echo 0 > /proc/sys/vm/laptop_mode
# turn brightness up the whole way
echo 15 > /sys/devices/platform/eeepc/backlight/eeepc/brightness
# disk
echo 10 > /proc/sys/vm/dirty_ratio
echo 5 > /proc/sys/vm/dirty_background_ratio
echo 500 > /proc/sys/vm/dirty_writeback_centisecs
# proccessor on performance
echo 0 > /sys/devices/platform/eeepc/cpufv
# screen off after 10 minutes
xset dpms 0 0 600
else
# Turn on aggressive power savings
echo 5 > /proc/sys/vm/laptop_mode
# turn brightness down the whole way
echo 0 > /sys/devices/platform/eeepc/backlight/eeepc/brightness
# disk
echo 40 > /proc/sys/vm/dirty_ratio
echo 10 > /proc/sys/vm/dirty_background_ratio
echo 1500 > /proc/sys/vm/dirty_writeback_centisecs
# proccessor on powersave
echo 2 > /sys/devices/platform/eeepc/cpufv
# screen off after 2 minutes
xset dpms 0 0 120
fi
It just so happens that "on_ac_power" returns true if it's on AC power, and false if it's not.

This should be a power script (/usr/lib/pm-utils/power.d/).

Note: on a clean install this should work, though there have been some issues. Make sure you don't link, but actually copy the script, and have the right permissions. Using the "install" tool is recommended.

Start scripts (and action scripts)

So since this post depends so much on action scripts, here's how to make them.

The folders for the ones we've found today are as follows:

 scripts run on startup:    /etc/rcS.d/
scripts on power (on/off): /usr/lib/pm-utils/power.d
The job is pretty easy. What you need to do is write the script, copy it to the folder, and then set it to be executable (the last two actions can be done with one command: the "install" tool.

First, write the script. In this case I have three start scripts:

S95make_tmp_folders

 # apt log
mkdir /var/log/apt\

S96disk_editing

 # Deadline
echo deadline > /sys/block/sda/queue/scheduler
# FIFO
echo 1 > /sys/block/sda/queue/iosched/fifo_batch

S97turn_off_hardware

 # camera
echo 0 > /sys/devices/platform/eeepc/camera
# card reader
echo 0 > /sys/devices/platform/eeepc/cardr

After each file is written, simple run:

install {filename} /etc/rcS.d/
and the file will be installed to this folder.

In the case of our power script we want it to be run on start up, power flux. So we'll run:


install 99power_save /usr/lib/pm-utils/power.d
install 99power_save /etc/rcS.d
Where 99power_save is the name of the script that we wrote above.

Wednesday, December 16, 2009

Tale of Three Music Players

Once upon a time I used Amarok. Those were the good days. MySql Databases with statistics, etc. Then Amarok 2 came along. I figured out a way to go back to my former love, with the capabilities instead of cheesy looks.
But this didn't last forever, for then I got a Eee PC, and due to my laziness, I didn't install amarok1.4 (the good one). Instead, since I had lost my database, I tested Rhythmbox.

Rhythmbox was good to me for a while. We played many a piece of music together. Then a friend encouraged me to test out Banshee. Banshee did scores just like Amarok did! So I tried it out.

Banshee had everything I would want in a music player. It had scores (though not nearly as good as I had remembered amarok), it handled libraries for videos, and even though I couldn't embed my tags in the videos, it tagged the videos. What Rhythmbox didn't have was a good library organization, and Banshee handled that too! (kinda... it sorta did it while it was going instead of all at once like I would have wanted... leaving half my music sorted and the other half messy in the same folder).

But Banshee was still new, and so didn't have a good relationship with mp3s. In fact, my poor flash drive was being read/written the whole time the song was playing, so I decided that this was reason enough to go back to Rhythmbox. After all, it's the tried and true that keep us going. Besides, Rhythmbox could handle me dropping new files into the folder right away.

Soon, I bought a CD. Without proper CD ripping equipment, I was forced to copy the *.wav files off the CD, and then encode to mp3. But the mp3s were tagless.
So I tagged them in Rhythmbox.
But Rhythmbox couldn't sort them. Instead I had to deal with "Track 1.mp3" files. Which was unacceptable. If I do this with another CD, the files would get replaced!

Then I discovered a program. EasyTag. EasyTag easily tags the mp3s and sorts them.

So I ran it. The mp3s was now organized.

But my playcounts!! They were gone! Rhythmbox couldn't handle the files being in a new location!


So then I remembered my former love. Even without MySql Amarok is superior in all functionality.


Amarok:
  • Score and Playcounts (which happen to be smarter then Banshee)

  • Scripts/Plugins

  • Lyric support (you know... for my Swahili/Kikuyu music)

  • Last.fm Support (+ queuing if offline)

  • Smart Playlists

  • Good Random tool for Playlist

  • Organize Mode

  • Album Cover Organizer

  • (+ A lot of other options.. in 1.4)


Rhythmbox:
  • Playcount

  • Hot Scanning

  • Very stable

  • Random tool for Now Playing

  • Lyric searching

  • Last.fm support (+ Queuing if offline)

  • Easy to add covers to CURRENTLY playing song


Banshee:
  • Playcount/Score (inferior)

  • Lyric support

  • Unstable

  • Last.fm

  • No organize mode, but it organizes...kinda

  • Video Library!

Tuesday, November 24, 2009

Eee PC (Ubuntu)

The Eee PC is quite a effective, and small unit. It's lasted three months in my hands, which is probably a good sign (realizing how I've screwed up the keyboard with soapy-wet hands)

Ubuntu Netbook remix made a big leap in the latest release, also.
Maximus seems more stable, and the layout is quite a bit better.


The main problem is when you switch to Ubuntu there are certain features, like disabling:
- Camera
- Card Reader
- Wireless
That you can't fully control. Sure you can disable the "wireless" in Ubuntu, but the actual wireless card is still on unless you disable it in bios.

eee-control fixes this though.
The version in Jaunty is quite effective. It controls wireless, camera, card reader, brightness, processor and fan speeds, and probably some other things I forgot.

If you like the newest version of Ubuntu (9.10), then you're out of luck. Building eee-control fails.
Rumor has it that the karmic build will be available soon.

Wednesday, November 18, 2009

Mutt: Scripting mail

With 'mutt' we can generate e-mails and have them sent to our default e-mail address, in this case me@domain.com
mutt -s "Subject line here" me@domain.com < /path/to/message
is the correct command for this e-mail address. You can find more details at http://www.cyberciti.biz/tips/sending-mail-with-attachment.html or the man page of mutt.

In the end, my script looks like this:
# Sends the IP address to default address
to="me"
from="noreply"
domain="domain.com"
temp=`mktemp -t`
ifconfig ppp0 > $temp
mutt -e "set from=$from@$domain" -s "IP address - $HOSTNAME" "$to@$domain" < $temp

$HOSTNAME is set based off the hostname of the computer. In my case this name is specific to the location and is unique. This helps me know which school I'm contacting.
The other main addition is the "-e" command.
If you look online you'll find that in order to send from a specific domain, you need to set up a muttrc file. Since we're running a script, and it makes more sense to keep everything together, I decided it's better to just add the "set from=" command in the script instead of an outside file.
The "-e" command lets you do this. It must be in quotes, otherwise it'll throw an error.

This is also added to the ip-up script that is run when ppp0 makes a connection.

You'll then need to make sure that postfix is installed. The best way, is to set up postfix and have it send through a designated email address. I simply set up a "noreply" email address on our domain that I would log into to send the email.
You can find instructions here: http://serverfault.com/questions/119278/configure-postfix-to-send-relay-emails-gmail-smtp-gmail-com-via-port-587/119296#119296

Squid -- Transparency

Edit: updated for what I'm currently doing in 10.04 and 10.10 (ubuntu)

A few guides gave ideas on how to get iptables to work:
# Add to IP tables
# squid server IP
lan=`ifconfig -s | grep eth | awk '{print $1}'`
s_port="3128"
iptables -t nat -A PREROUTING -i $lan -p tcp --dport 80 -j REDIRECT --to-port $s_port


The problem is on restarting the computer, it seemed to disappear. So I thought I had figured it out, until it didn't work anymore.

Eventually I ended up re-building it each time ppp0 was created by putting it as a process in ip-up.d/

Oh, also don't forget to add "transparent" to the line in the squid.conf file.

http_port 3128 transparent
To learn more about iptables: http://www.frozentux.net/documents/iptables-tutorial/

From here you can directly connect squid to apt-cacher-ng, and have transparent caching of your debian files. Just set up apt-cacher-ng as a peer.

Squid

Squid was relatively easy to set up. There were a few pitfalls, as there are with most programs that seem rather critical to internet usage.

For the most part there was very little deviation from from the regular config, so instead of listing my whole configuration, I'm going to simply list the options I chose and why.

Note: this was written using Squid3

ACL list
In order to define who has access and who doesn't, you probably have noticed that squid.conf has an acl list. In version 3, the acl section is around line 400. It's important to edit this so that the squid server allows connections from your localnet and your localhost.
example:
acl localhost src 127.0.0.1/32
acl localnet src 10.42.43.0/255.255.255.0
I saw many ways to configure the localnet ip address, some being relatively simple (10.42.43.0/32) but this way seems the most obvious, and a bit less confusing.
It's of course important to then set:
http_access allow localnet
http_access allow localhost

http_port
By default the port is set to 3128. But you already knew that. If for some reason you know how to set up a transparent proxy, you can type "transparent" after the port you want to transparently listen. Transparency is a post in and of itself.
What you should realize is that "accel" doesn't refer to accelerating the connection in any way. Unless you know what this means (which I still haven't figured out) you probably shouldn't use it.

Replacement Policies (the cache)
There are two places the cache is stored in: memory and hard disk. For the most part the cache can be left alone, but it makes sense to at least mess around with how the cache works.
The Replacement policy that I used were:
heap GDSF : for the memory
heap LFUDA : for the disk cache
From the config file:

The heap GDSF policy optimizes object hit rate by keeping smaller popular objects in cache so it has a better chance of getting a hit. It achieves a lower byte hit rate than LFUDA though since it evicts larger (possibly popular) objects.

The heap LFUDA policy keeps popular objects in cache regardless of their size and thus optimizes byte hit rate at the expense of hit rate since one large, popular object will prevent many smaller, slightly less popular objects from being cached.

So while LFUDA is most important (saving bandwidth) for our purposes, GDSF might as well be used for memory to increase memory hits.


Paths to know:
/var/spool/squid - where the cache is stored
/var/log/squid - where to access the logs:
access.log should ping whenever someone connects. it's nice to see how effective the server is
cache.log is often used for logging
/etc/squid - where the logs are stored
/etc/init.d/squid - to restart the server

These paths MAY OR MAY NOT have a 3 after them, depending on your version.

Some of the resources I found helpful are:
Squid - The Definite Guide : http://oreilly.com/catalog/9780596001629
Squid by Oskar Pearson : http://proxy.ccu.edu.tw/squid/index.html

Hand in hand with Squid is SquidGuard.